


 5:34 AM

Computer Tips From A Computer Guy |

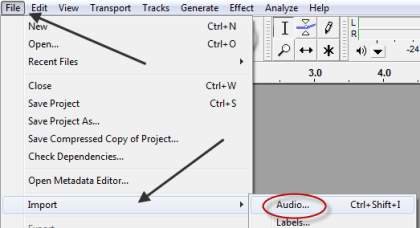
| How to Get Rid of Ambient Noise in an Audio File using Audacity Posted: 26 Apr 2011 04:44 AM PDT If you've ever used a microphone to record your voice using your computer, you've likely been irritated by the background noise that is picked up along with your recording. Such background noise mars a recording, making it sound bad and amateurish. Luckily, there's a way to fix this problem, and it won't cost you a cent. Audacity is a free software product that can be used for recording voice or music, or for editing or mixing tracks and also to clean up recording problems such as ambient background noise. To use Audacity, you first have to download it from their web site, and install it onto your computer. Next, make sure your audio recording is on your computer and in a place where you can find it. Then, fire up Audacity and load your recording by choosing File from the main menu, then selecting Import, then Audio…
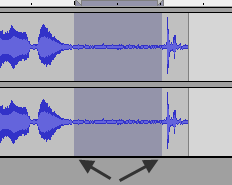
Select your recording by double-clicking on it, or by highlighting it then clicking the Open button. Once you've imported your recording, you should see a track open in the main menu, that looks something like this:
The lines on the track are waveforms and they're important when trying to clean a track, because the longer (wider) the waveform, the louder the noise recorded. Look for a portion of the track that is flat; the flatter the better. This will be a portion of the track where no sound other than the ambient noise is present. Select that portion of your track by clicking with your mouse and dragging it for the full length of the flat section.
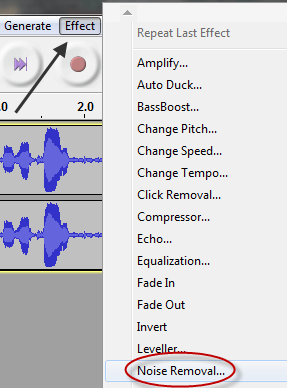
What you're doing here is selecting a sample of your recording for Audacity to use as a guide, so it'll know what you're trying to get rid of. Next, select Effect, then Noise Removal from the main menu.
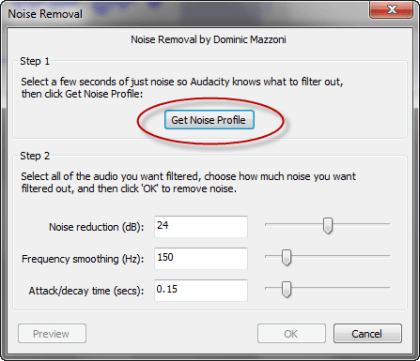
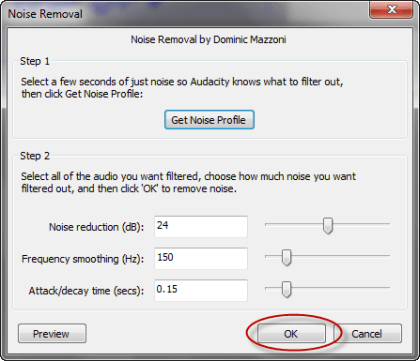
You should get this popup:
Click the Get Noise Profile button. The popup window should disappear, taking you back to the Audacity screen. This time, select the entire audio recording by pressing Ctrl-A on your keyboard:
Next, select Effect, then Noise Removal from the main menu again, to once again bring up this popup:
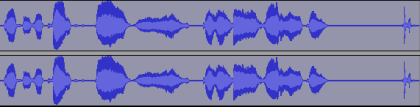
You can fool around with the settings if you wish, by moving the sliders around, but for your first try, it's generally best to go with the defaults, and simply click the OK button. Audacity should do it's thing; then, when it finishes, you should see that Audacity has flattened out the fuzzy parts of your waveform:
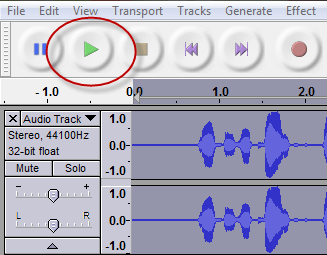
To listen to how your recording sounds after cleaning, click the Play button:
Your recording should be noticeably cleaner sounding. Getting rid of ambient noise is just one of the many things you can do with Audacity, to see some others, you need only start playing around with some of the menu options.
Related postsCopyright © 2007 Online Tech Tips. Aseem Kishore (digitalfingerprint: a59a56dce36427d83e23b501579944fcakmk1980 (74.125.94.86) ) Post from:
|
| Prevent Users from Deleting Printers in Windows 7 Posted: 25 Apr 2011 05:00 AM PDT Printer software and drivers used to be a lot more finicky in earlier version of Windows. Today, printers are much more reliable when using the latest version of the operating system. When users encounter printer problems, the old method of deleting and reinstalling the printer is still a common way to restoring a printer. As an administrator, you can prevent users from deleting printers in Windows 7 until a qualified technician can fix the problem. Why Prevent Users from Deleting Printers?Just behind monitors and speakers, the printer is one of the most common output peripherals connected to a PC. More and more in home environments, printers are networked to allow all users of all computers in a household to print using the same device. What one user does to a printer affects all other users. This creates a problem because some users take it upon themselves (often in haste) to correct printer errors. The most common method of fixing a printer error is to delete it from Windows 7 and attempt to reinstall it. Network connections are often severed in the process preventing all users from printing even if the printer's drivers are successfully reinstalled. As an administrator, you can prevent users of Windows 7 from deleting printers from the operating system. Doing so ensures that network connections are not severed and the problem can be fixed by a qualified technician or someone familiar with common printer errors. Preventing Users from Deleting Printers from Windows 7To make this change, you need to log in to Windows 7 using an account that has administrative privileges. Then, click on Start>Run or hold down the Windows key on your keyboard and press the R key to open the Run dialogue box. With the Run box open, type in gpedit.msc and click the OK button. You are now looking at the Local Group Policy Editor. In the left hand pane, locate the policies at User Configuration>Administrative Templates>Control Panel>Printers. Be sure to click on the Printers folder itself.
The right hand pane lists the policies associated with printers on your Windows 7 PC. Locate the policy labeled Prevent Deletion of Printers. Double click on it to open the options for that policy.
Assuming this policy has never been edited, it should be set to the default Not Configured. All you need to do is select the Enabled option, click the OK button, and close the Local Group Policy Editor. That's it. Now users cannot delete printers in Windows 7.
Note that this option only prevents users from deleting printers from the Control Panel. Many printer installations also include an uninstall application to make removing a printer from Windows 7 simpler. If you want to completely prevent users from removing a printer from Windows 7, be sure to delete or prevent access to those applications as well. Many users who try to troubleshoot printer errors do so by deleting and reinstalling the printer from the Window 7 Control Panel. This often severs network connections and affects all users of a printer. As an administrator, you can prevent users from deleting printers from Windows 7 by simply editing a group policy.
Related postsCopyright © 2007 Online Tech Tips. Aseem Kishore (digitalfingerprint: a59a56dce36427d83e23b501579944fcakmk1980 (74.125.94.86) ) Post from:
|


| You are subscribed to email updates from Online Tech Tips To stop receiving these emails, you may unsubscribe now. | Email delivery powered by Google |
| Google Inc., 20 West Kinzie, Chicago IL USA 60610 | |
0 comments:
Post a Comment