Saturday, April 30, 2011

Mobilink Jazz Introduces Daily Mobile Internet: ProPakistani

Mobilink Jazz Introduces Daily Mobile Internet: ProPakistani

Link to Pro Pakistani

Mobilink Jazz Introduces Daily Mobile Internet

Posted: 30 Apr 2011 01:03 AM PDT


Mobilink Jazz Introduces Daily Mobile Internet is a post from: ProPakistani

4 30 2011 3 39 17 PM1 300x191 Mobilink Jazz Introduces Daily Mobile InternetJazz Jazba now introduces daily unlimited internet service with no limits on internet usage.

Now you can use daily unlimited internet on you Jazz Jazba connection with no data limit in Rs. 9.99 per day.

How to activate?
  • Send an SMS to 6006 to activate Mobile Internet.
  • Mobile Internet will be activated after 24 hours.
  • No activation required for existing Mobile Internet subscribers.

Charges:

  • The activation is free.
  • Subscribers will be charged Rs. 9.99 on the day they use the Mobile Internet.
Terms and Conditions:
  • Unlimited usage with no time limits.
  • Internet charges will be deducted at day end.
  • This offer is only valid for JAZZ & Jazba customers.
  • No taxes apply.

Related posts:

Copyright © 2010 ProPakistani.PK

Computer Tips From A Computer Guy

Computer Tips From A Computer Guy


Download All of Your Facebook Photos the Easy Way

Posted: 30 Apr 2011 04:48 AM PDT

Sharing photos on Facebook is super easy. We can upload photos from our computers, send photos from our cell phones or take photos directly from a Web cam. However, downloading the photos from Facebook is a tedious process. Every photo must be downloaded individually.

Pick&Zip can download all of your Facebook photos—even photos other people post and "tag" you—in just a few mouse clicks.

logo

Click the Login with Facebook button at the top of the Pack&Zip homepage.

login

A window will open asking you to allow Pack&Zip access to your Facebook account. Click Allow.

allow

The Pack&Zip page reloads, this time listing all of your friends in a list on the left. Just below this list, click the Find My Photos button.

find

Photos in which you were tagged appear first. Click the Albums tab to see each of your individual Facebook photo albums.

albums

To download an individual photo, hover over the photo, then click the arrow that appears in the bottom-right corner of the photo. You can download the photo in a zip file, or as a PDF.

cupcake

To download an entire album, click the Select All button at the bottom of the screen.

select all

Then click the Download tab in the top-right of the screen.

image

In the middle of the page, click Download my selected photos. Your selected photos will download to your computer.

download1

If you are in a hurry and just want to download any and all uploaded or tagged photos, click the Download tab, then click the green Download all photos button. Every photo will begin to download to your computer in a nice, neat zip file.

image

As a bonus, you can also download your friends' photos. Click any of your friends names, then follow the same steps above to download any, or all, of your friends' photos. This also works for your favorite Facebook Pages and Groups.

image

Pack&Zip works quickly and easily—just like they promise. Within just a few minutes, you can download all of your, or any of your friends' photos. The app is definitely worth a bookmark, if for no other reason than archival purposes.


Copyright © 2007
Online Tech Tips.
Aseem Kishore (digitalfingerprint: a59a56dce36427d83e23b501579944fcakmk1980 (209.85.224.86) )

Post from:

Download All of Your Facebook Photos the Easy Way


How to Record a Podcast using Audacity

Posted: 29 Apr 2011 05:50 AM PDT

Audacity is the most popular open source sound recording and editing software on the Internet for Windows computers, and for good reason, it's loaded with powerful tools and can perform some of the simple functions you'd like to do without a lot of fuss. One such application is recording a podcast so you can post it on your website.

To use Audacity to record your podcast, first download it if you don't have it yet, install according to the instructions, then run it.

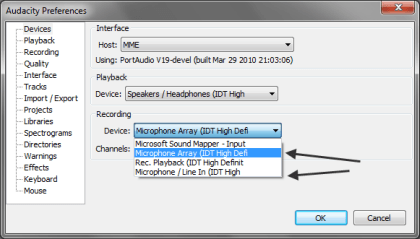
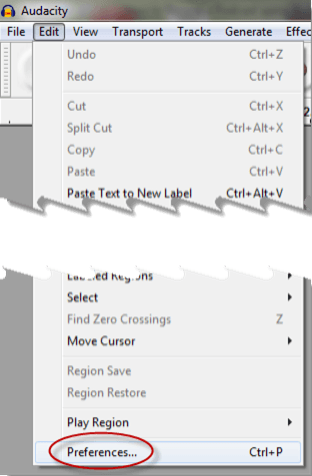
Before you start recording though, it's a good idea to make sure you're using the right software driver for your microphone, to do that, click on Edit, then Preferences:

Menu Preferences

Then under Recording, click the dropdown labeled Device, you should see something like this:

Recording Devices

Choose the device driver associated with the microphone you'll actually be using.

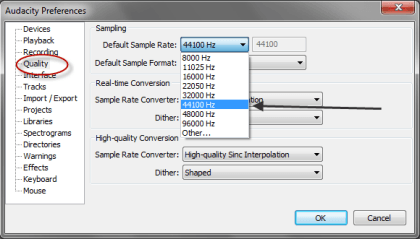
Next, move down the same preferences menu and click where it says Quality, then click the dropdown next to where it says Default Sample Rate; change it to 44100Hz if that is not your default, anything higher and you'll run into problems with some media players that don't support higher sampling rates.

Sample Rate

Click the OK button and you should be ready to roll.

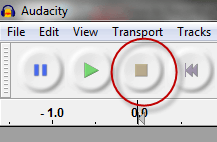
Before you begin however, be sure you know what you're going to say, also be aware of using um and ah and uh a lot as that makes it hard to listen. When you're ready, click the Record button…

Record Button

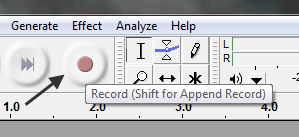
…and start speaking.

Try not to speak too close to your microphone because you'll get a lot of pops. If you make a mistake, simply pause a moment, then start over, you can edit out mistakes later. When you're done, hit the Stop button

Stop Button

Special Note: It's always a good idea to do a couple of practice runs before recording your whole podcast, otherwise you might find yourself having to do the whole thing over and over again if there are problems with the microphone etc.

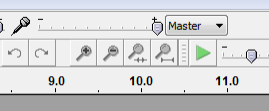
If you find your voice doesn't sound right, you can try adjusting the volume control:

Volume

Also, be sure to leave an empty space on the track so that you can Get Rid of Ambient Noise Using Audacity once you've finished your recording.

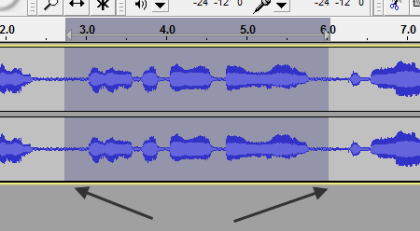
Once you've got your podcast recorded, you'll most likely want to edit it; you can begin by highlighting sections with your mouse, and simply hitting the Delete key to get rid of unwanted sections:

Delete

Also, to cut a section and paste it in somewhere else, highlight it with your mouse, hit Ctrl-X, move to the place where you want to paste it in, then hit Ctrl-V.

Note: You can also cut a section out of a different recording (such as your intro for a prior Podcast) and paste it in if you wish.

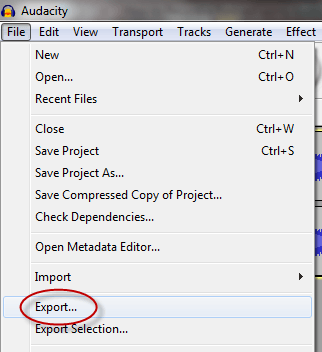
When you're happy with your recording, click the File menu choice, then choose Export…

Export

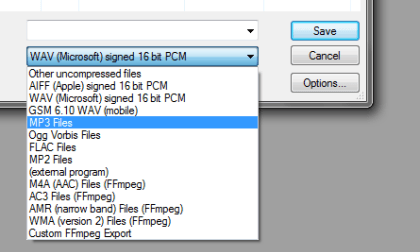
…then click on the dropdown labeled Save as type: and choose your format (generally MP3).

Save as MP3 file

Then, type in a file name, choose your location and click Save, and you're done recording your podcast.


Copyright © 2007
Online Tech Tips.
Aseem Kishore (digitalfingerprint: a59a56dce36427d83e23b501579944fcakmk1980 (209.85.224.86) )

Post from:

How to Record a Podcast using Audacity


Design by Free WordPress Themes | Bloggerized by Lasantha - Premium Blogger Themes | Justin Bieber, Gold Price in India