Thursday, December 16, 2010

[Inside AdSense] Google Apps welcomes AdSense

Google Apps is Google's suite of cloud-based messaging and collaboration apps used by over 30 million users in small and large businesses, educational institutions, government agencies, and non-profit organizations around the world. Apps includes products such as Gmail, calendar, documents, spreadsheets and more, specifically optimized for use in organizations.

We recently launched an improvement to Google Apps that made dozens of Google services, including AdSense, available to Apps users for the first time. Before this improvement, Google Apps users had to create a separate account to sign in to AdSense; now, Apps users can access their cloud-based productivity applications along with AdSense using the same account.

For those of you who also have a Google Apps account, we're in the process of finalizing the infrastructure that will allow you to seamlessly transition your existing AdSense account and data over to your Google Apps account. For new users, if your Apps systems administrator has enabled AdSense, you can begin using this services with your existing Apps account at google.com/adsense.

If you haven't started using Google Apps yet to manage collaboration for your business, learn more about how to lower IT costs and improve productivity at google.com/apps.

For more details, read the complete post on the Google Enterprise blog and follow all the updates on other newly available services for Google Apps users.


--
Posted By Inside AdSense Team to Inside AdSense at 12/16/2010 08:40:00 AM

--
Unable to view the links or images in the message above? Want to comment on this post? Visit http://adsense.blogspot.com/ .
 
You received this message because you are subscribed to the Google Groups "Inside AdSense" group.
To unsubscribe from this group, send email to Inside-AdSense-unsubscribe@googlegroups.com
For more options, visit this group at http://groups.google.com/group/Inside-AdSense

How to Make and Reuse Homemade Holiday Decorations

eHow.com - How To Do Just About Everything
eHow Of The Day

How to Make and Reuse Homemade Holiday Decorations

by Cyndee Kromminga

Recycling doesn't always have to mean reusing trash in a new way, it can also be used to give new life to once-loved items from holidays in the past. Make and reuse homemade holiday decorations inexpensively. Christmas decorations that are worn out and need to be replaced or collections that have overwhelmed your decorated spaces can be refurbished into lovely new accents for your home. Repurpose those decorations that haven't been used in years with a few tweaks of inspiration.…Keep reading


Advertisement

Featured Member Articles
You Should Follow Us!

Computer Tips From A Computer Guy

Computer Tips From A Computer Guy


Fix Windows Live Mail Error 0×800CCC0B

Posted: 16 Dec 2010 04:55 AM PST

Windows Live Mail is the e-mail client that is part of Microsoft’s Windows Live suite of applications. A common error encountered when using Live Mail has to do with authenticating a server for outgoing mail. Learn how to fix Windows Live Mail Error 0×800CCC0B.

Authentication of Outgoing E-mail Servers

When receiving mail in any e-mail client, it is necessary to use a username and password to authenticate that you have the right to receive the e-mails in your account. The Post Office Protocol (POP) server, managed by your e-mail provider, handles incoming mail.

Many e-mail service providers, however, do not require authentication for outgoing mail. Most e-mail service providers use the Simple Mail Transfer Protocol (SMTP) to handle outgoing mail. If you receive Windows Live Mail error 0×800CCC0B, it is possible that your e-mail service provider requires authentication for outgoing as well as incoming mail.

In Windows Live Mail, you can turn on authentication on an account-by-account basis. Before you proceed with the fix below, be sure you are applying it only to the account(s) that are experiencing the error. Adding authentication to an account that does not require it can cause further errors with the account.

Fix Error 0×800CCC0B in Windows Live Mail

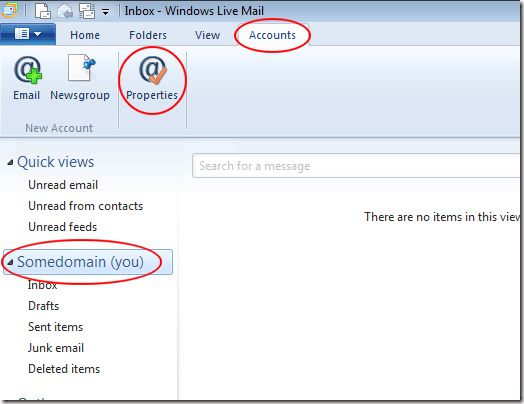
Open up Windows Live Mail and click on the Accounts tab. Click on the e-mail account giving you the error and then click on the Properties button.

Windows Live Mail Account Properties

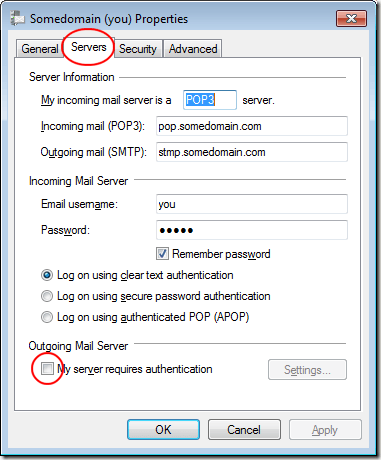
You should now be looking at the properties for your e-mail account. Click on the Servers tab and locate a section of the window titled Outgoing Mail Server. Check the box labeled My Server Requires Authentication.

Windows Live Mail Outgoing Server Authentication

Normally, your e-mail service provider will use the same username and password for outgoing mail as it uses for incoming mail to authenticate that you are authorized to send mail from the account. If this is not the case, click on the Settings button.

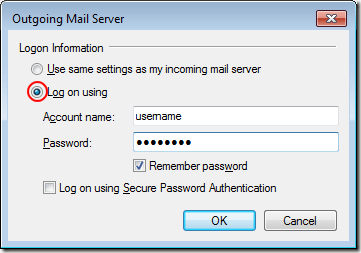
You should now be looking at the Outgoing Mail Server properties window. By default, the option titled Use the Same Settings as My Incoming Mail Server is selected. Check the option titled Log on Using. Type in your Account Name and Password information for outgoing mail.

Fix Windows Live Mail Error 0x800CCC0B

It is up to you whether to choose the option labeled Remember Password. Unless you are using a PC that is located in an unsecure location, you should keep this option checked.

Otherwise, you will have to type in your username and password every time you want to send mail from this account. Click the OK button on the window and then click on the OK button in the properties window. Send an e-mail from the account and see if the error disappears.

Windows Live Mail, like any mail client, is capable of securely receiving and sending e-mail from your e-mail service provider. Some service providers require server authentication for both incoming and outgoing mail.

This can result in a Windows Live Error. By checking a simple option in the application and optionally adding username and password information, you can fix Windows Live Error 0×800CCC0B.


Copyright © 2007
Online Tech Tips.
Aseem Kishore (digitalfingerprint: a59a56dce36427d83e23b501579944fcakmk1980 (209.85.224.87) )

Post from:

Fix Windows Live Mail Error 0×800CCC0B


Allow Multiple Users Access to Your Gmail Account

Posted: 16 Dec 2010 03:00 AM PST

For most of us, our email accounts are private communication tools we would never dream of sharing with anyone else. But, in the business world, email addresses are often part of corporate branding, so it is not uncommon for several employees to answer client emails from the same account.

Gmail announced a new feature this week: the option to allow other people to access your Gmail account. While this may sound creepy on a personal level, for small Web entrepreneurs, this feature could be quite beneficial.

logo

Google is quick to say they have been offering this option to Google Aps users for awhile. Even more, the feature is not unlike an exceptionally old option that allows users to send email on behalf of any other approved email address.

To start using this service, click settings at the top of the Gmail screen.

settings

Next, click the Accounts tab.

accounts

Scroll until you see the Grant Access to Your Account option near the bottom of the page. Click Add another account.

grant access

A popup window will ask you to enter the Google account for the person to whom you wish to grant access. If the person does not have a Google account, they must create one before you can grant him access. Enter the person's email address and click next.

email

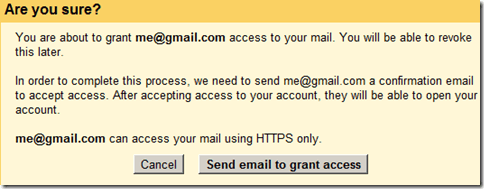
The next screen tells that you are about to give someone else access to your account and they must accept access. It also tells that you can revoke access later. Click Send Email to Grant Access.

sure

Once the person accepts, they can switch to your email any time by clicking a dropdown menu where the current account name is displayed at the top of the page. Email sent this way will be labeled sent on behalf of with their Gmail address displayed alongside yours.

dropdown

Granting access to your account only gives the other person access to your inbox to read and send messages. They cannot change your password or settings, and you can revoke the privilege at any time.

Gmail is calling this feature Email Delegation in its press releases, but besides allowing other people access to your account, this feature could make it easier to maintain your own multiple Gmail accounts without logging in and out of Google all day—just link your Google accounts in the same method.


Copyright © 2007
Online Tech Tips.
Aseem Kishore (digitalfingerprint: a59a56dce36427d83e23b501579944fcakmk1980 (209.85.224.87) )

Post from:

Allow Multiple Users Access to Your Gmail Account


Fix Microsoft Word has Stopped Working

Posted: 15 Dec 2010 04:55 AM PST

I recently installed Office 2010 on a Windows 7 machine and everything worked fine for a few days, but all of a sudden when I open Word, I get the following error message:

Microsoft Word has stopped working

It then gives me the option to check online for a solution or to close the program.
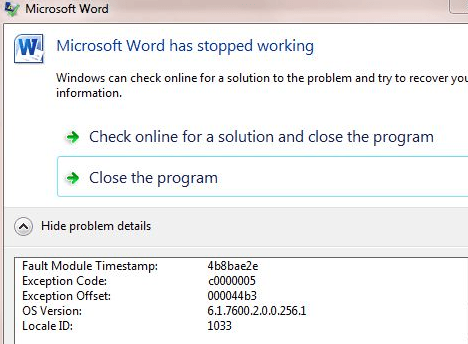
word has stopped working

After this, I could not even open Word 2010 anymore! It would simply close down the program. How annoying! Anyway, after doing some research, I finally got the problem fixed. Depending on your situation, the solution may be different. I will try to post all of them here and hopefully one will work for you.

Method 1 – Repair Office 2010/Office 2007

To perform a repair of Office 2010/2007, go to Start, then Control Panel and click on Programs and Features. Click on the Office 2010/2007 program and click Change.
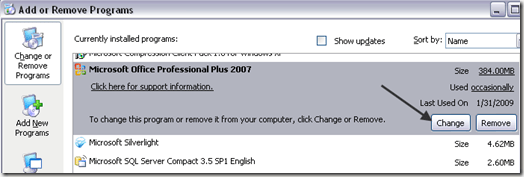
word not working

Click Repair and then click Continue. Let the repair finish, which could take a while, and then restart your computer.
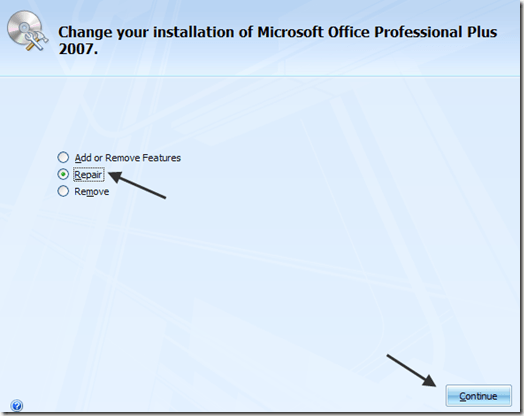
word stopped working

If you continue to get the "Word has stopped working" message, then keep reading for more possible solutions!

Method 2 – Disable All Add-ins

Sometimes an add-in that gets installed automatically by another program (such as Adobe, etc), might cause Word to crash. In this case, you can start Word in Safe Mode, which does not load any add-ins.

Simply click on Start and then Run or if you're using Windows 7, just type the following command into the search box:

winword.exe /a

Now click on the Office button and click on Word Options.
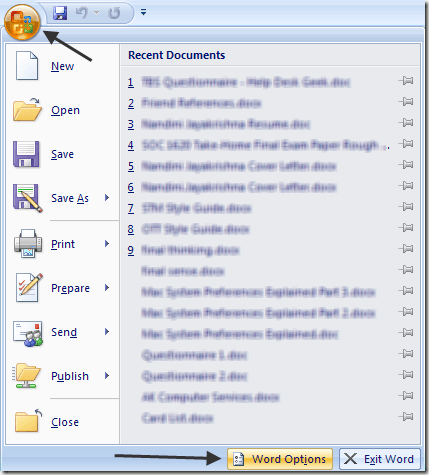
word error

Click on Add-Ins and then disable all add-ins and try to load Word again normally.
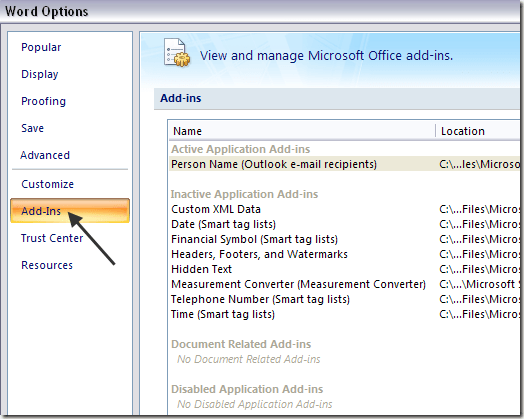
disable word addins

Method 3 – Install Latest Updates

If that didn't work for you either, then you should try to download and install the latest updates for your version of Office. Sometimes it's a glitch that is fixed when you install the latest patches and fixes.

In Windows 7, you can go to Automatic Updates from the Control Panel and find the latest updates. You can also visit the Office download center and download service packs for Office 2007, etc:

http://office.microsoft.com/en-us/downloads/

Method 4 – Delete the Word Data Registry Key

There is a key in the registry that stores frequently used options in Word. If you delete the key, Word rebuilds it the next time you start Word by using the default settings.

You can delete the Word data key by going to the following location in the registry depending on your version of Word:

  • Word 2002:HKEY_CURRENT_USER\Software\Microsoft \Office\10.0\Word\Data
  • Word 2003:HKEY_CURRENT_USER\Software\Microsoft\ Office\11.0\Word\Data
  • Word 2007:HKEY_CURRENT_USER\Software\Microsoft\ Office\12.0\Word\Data
  • Word 2010:HKEY_CURRENT_USER\Software\Microsoft\Office\14.0\Word\Data
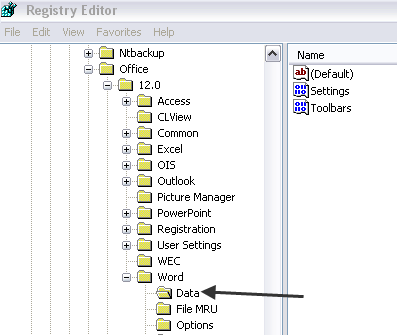
delete word data key

Simply right click on the Data key and choose Delete. Now restart Word and see if the problem has gone away or not.

Method 5 – Remove Older Printer Drivers

Oddly enough, this ended up being the cause of my problem. I had an older print driver installed on my Windows 7 machine and once I removed that driver, Word started working without any problems!

You can delete individual printer drivers by going into the registry. Note that simply going to Printers and Faxes and deleting a printer there does not delete the printer driver.

Follow Step 3 in my previous post about a printer error to remove the printer drivers:

http://www.online-tech-tips.com/computer-tips/fix-the-printer-spooler-service-terminated-unexpectedly/

Method 6 – Uninstall Recent Software

At this point, you have also think about any software or plugins that you may have installed on your computer. Annoyingly, this problem with Word can be caused by a program that is completely unrelated to Word!

Did you recently install some new hardware? A printer, scanner, label machine, web cam, tablet, etc? Have you installed any software? If so, uninstall it and see if the problem goes away.

Method 7 – Completely Uninstall and Reinstall Office

If nothing has worked yet, there are not many options left! You can try to perform a full uninstall and then reinstall to see if the problem is fixed.

Go to this link first and download the Fix It solution for your version of Office:

http://support.microsoft.com/kb/290301

Once you run that, go ahead and restart the computer and reinstall your version of Office.

If you have found a different solution to this problem, post a comment here and let us know!


Copyright © 2007
Online Tech Tips.
Aseem Kishore (digitalfingerprint: a59a56dce36427d83e23b501579944fcakmk1980 (209.85.224.87) )

Post from:

Fix Microsoft Word has Stopped Working


Design by Free WordPress Themes | Bloggerized by Lasantha - Premium Blogger Themes | Justin Bieber, Gold Price in India