


 5:31 AM

Computer Tips From A Computer Guy |

| Delete The Recycle Bin and Pin To Taskbar In Windows 7 Posted: 20 Mar 2011 04:26 AM PDT Deleting the recycle bin is unlike deleting a normal icon or shortcut on the Windows 7 desktop. You cannot just right-click and then select delete from the context menu. However, this quick tip allows you to remove the recycle bin from the desktop and pin it to the taskbar. If you prefer a clean desktop with no icons and all wallpaper, this is the easiest and best way to delete the recycle bin.
There are a couple of different ways that people have found to delete the recycle bin, but our simple tutorial requires no terminal, commands, or other hacks. Here's how you do it: Step 1.Create a new folder on the desktop. Right click anywhere on the desktop and select New – Folder from the drop down menu. Once the new folder appears on the desktop, you can rename it as anything you'd like. For the sake of this tutorial, we will call the new folder Trash Bin.
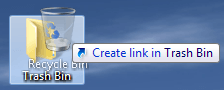
Step 2.Drag the Recycle Bin into your newly created folder. This will simply create a shortcut to the Recycle Bin within the folder.
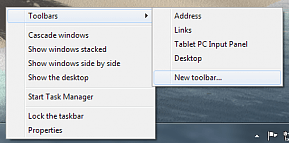
Step 3.Move the folder to the directory of your choice so that it is off of your desktop. For example, C:\Trash Bin. Step 4.Unlock the taskbar. Right-click in a blank area of the taskbar, and select Lock the Taskbar from the context menu. Note: There should not be a check next to Lock the Taskbar. Step 5.Create a new toolbar. Right-click in a blank area of the taskbar, and select Toolbar – New Toolbar.
You will now be prompted to select a folder. Navigate to the directory where you saved the folder with the recycle bin shortcut (C:\Trash Bin). Click the Select Folder button. Step 6.Notice that this creates a new toolbar and separator in the taskbar.
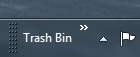
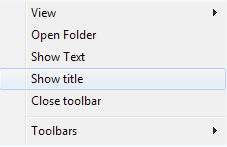
Right-click on the separator (the dotted lines), and uncheck Show Text and Show Title.
Step 7.The recycle bin icon should now show up in the taskbar. However, you may want a larger icon. Right-click on the separator (the dotted lines), and select to check View – Large Icons.
Step 8.The recycle bin is now on the taskbar.
You can adjust the width, and move the recycle bin by left-clicking on the separator (dotted lines) and dragging along the taskbar to the desired position. Right-click in a blank area of the taskbar, and select Lock the Taskbar from the context menu. The dotted lines disappear and the recycle bin appears just like any other icon on your taskbar.
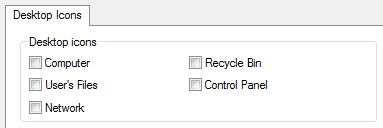
Step 9.Remove the recycle bin from the desktop. Right-click in any blank spot on the desktop, and select Personalize from the drop down menu. Click the link titled Change desktop icons.
Uncheck the box next to Recycle Bin, and click OK.
Step 10.Test out the new recycle bin taskbar icon. Right-clicking on the icon should even give you the option to empty the recycling bin. Also note, the newly created recycle bin in taskbar also responds to the recycling bin being empty or full (switches icons). That's all there is to it. You should now have successfully removed the recycle bin from the desktop, and pinned it to the taskbar.
Related postsCopyright © 2007 Online Tech Tips. Aseem Kishore (digitalfingerprint: a59a56dce36427d83e23b501579944fcakmk1980 (209.85.224.90) ) Post from:
|


| You are subscribed to email updates from Online Tech Tips To stop receiving these emails, you may unsubscribe now. | Email delivery powered by Google |
| Google Inc., 20 West Kinzie, Chicago IL USA 60610 | |
0 comments:
Post a Comment