


 5:30 AM

Computer Tips From A Computer Guy |

| Have Google Chrome Load a Custom URL when Opening a New Tab Posted: 16 Mar 2011 04:03 AM PDT One of the more annoying things about Google Chrome, even with the recent update, is the lack of a place to tell your browser that you would like to simply load a web page when you click the New tab, rather than have to wait for the default page to load; locate the one you're after, than load it. As an example, a lot of people would prefer that clicking on a New tab, would open a new tab with Google already loaded and ready to go. Fortunately, there is a way around this, here's how to do it. Go to the Google store and find this extension:
Click Download, wait a moment and you should get a message letting you know that your extension has been downloaded and installed correctly:
That's just the first part, to make the new extension actually redirect your browser, click the New tab "+" sign to start a new tab, you should get this screen:
The website in the box is the one that caused the page you're looking at to load, so you might want to copy that address and save it somewhere so you don't have to go into the extensions menu options to change it if you decide you want New tab to load a different page. Anyhow, to change the page that loads, type or paste the address into the box labeled Location, then click on the Save button. To see it work, click on New tab again; when it comes up, it should automatically load Google, or whatever site you typed in. If you do change your mind in the future at some point and want Chrome to either revert back to how it was originally, or to load a different page to load when you click on New page; click the Wrench icon:
Highlight the Tools menu choice, the choose Extensions…
…you should get something that looks like this:
Click where it says Uninstall to get rid of the extension altogether, or Options, if you want to change the URL of the page that loads. That should give you the same page as shown above for originally typing in the URL. Note: You can also click on the Disable choice to keep the extension in place, but to not run when a new tab is requested. Additional Note: Google Chrome has a lot of extensions you can download and use in roughly the same was as this one, and they can all be managed from this same page.
Related postsCopyright © 2007 Online Tech Tips. Aseem Kishore (digitalfingerprint: a59a56dce36427d83e23b501579944fcakmk1980 (209.85.224.85) ) Post from:
|
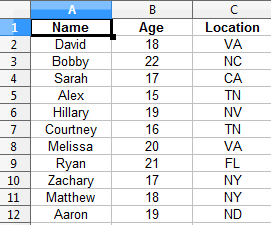
| Create Pivot Tables With OpenOffice Calc Posted: 15 Mar 2011 05:12 AM PDT One of the most popular features of Microsoft Excel is the ability to quickly analyze data using pivot tables. You can take advantage of the same feature in OpenOffice Calc. The only difference is, the pivot table feature is called DataPilot to prevent any copyright infringement with Microsoft. Regardless, the two work the same. Here, we take a look at how you can organize your data into a table format using the DataPilot feature. Prepare Your DataBefore you create a pivot table, make sure your data is ready to use. To make organization easier, give each column a distinct heading. Pivot tables need a heading in order to work properly. See the sample dataset below. Your dataset can be large or small. I am using a small set as an example.
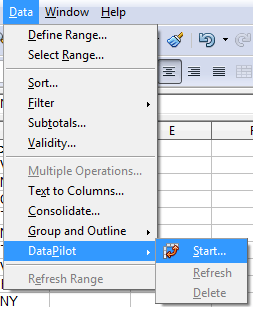
Next, highlight all the data you want to include in the pivot table, including the headings. Use your mouse to select all applicable cells. Once highlighted, go to Data, select DataPilot and choose Start.
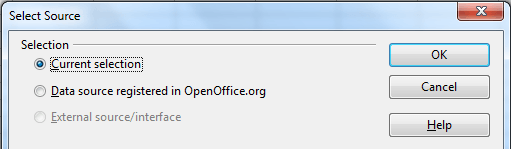
This starts the DataPilot wizard. Choose to either use your selected range or another data source in OpenOffice.
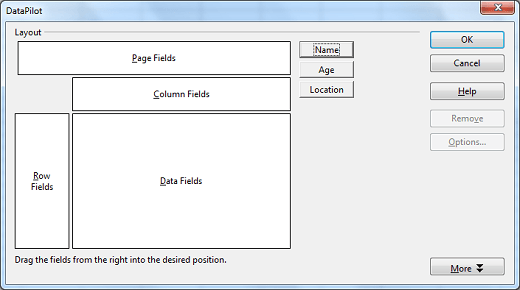
Press OK to continue. This displays the DataPilot window, where you can set up your pivot table.
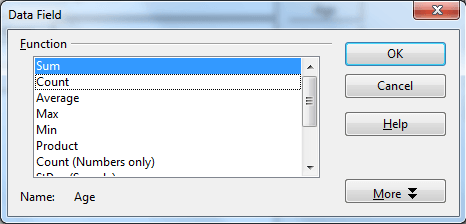
Drag and drop the fields you want to use from the center of the window to the appropriate fields on the layout screen. For instance, if you to sort your columns by location, you would drag the Location field to the Column Fields section. You do not have to use all layout sections, though you should use the Row Fields, Column Fields and Data Fields sections for most pivot tables. You can further organize your data by using the Page Fields section. The Data Fields section is your calculation area. Use this section to sum, average or count data. Further customize the Data Fields section by choosing the type of calculation. Press Options after dragging a field into the section and choose a calculation. Press OK to save your changes.
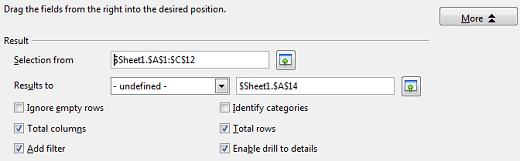
Press More in the main DataPilot window to select where to output your pivot table.
In the Results to section, use the first drop down box to select a new sheet. You can also input a range in the section box to display the pivot table on an existing sheet. Be careful not to use a cell range that is already occupied or you will overwrite your data in that section. Press OK to complete your pivot table. Your pivot table will display in the area you select. From here, you can filter or refresh your data. Right click any area of the pivot table to view your options.
Start lets you edit the pivot table. Refresh updates your pivot table with any changes you may have made to the original data source. Filter lets you further filter your data to see just what you need.
Related postsCopyright © 2007 Online Tech Tips. Aseem Kishore (digitalfingerprint: a59a56dce36427d83e23b501579944fcakmk1980 (209.85.224.85) ) Post from:
|


| You are subscribed to email updates from Online Tech Tips To stop receiving these emails, you may unsubscribe now. | Email delivery powered by Google |
| Google Inc., 20 West Kinzie, Chicago IL USA 60610 | |
0 comments:
Post a Comment