


 5:36 AM

Computer Tips From A Computer Guy |

- Best Free Online Spell Check Websites
- Use 2-Step Verification to Secure Your Gmail
- Change the Windows 7 Cursor to Look Like the Mac OS Cursor
| Best Free Online Spell Check Websites Posted: 25 Feb 2011 04:15 AM PST If you don’t want to download and install spell check software on your computer, there are plenty of free spell checkers that you can use online. Each of these sites lets you check the spelling of text or published web pages without registering for an account. JSpell.comThe free tool on JSpell.com checks spelling in multiple languages, including English, French, German and Italian. JSpell also includes a medical spell checker. To check your spelling on JSpell.com, you type or copy and paste your text into the field, then click the “Spell Check” button. The spell checker goes through the list of dictionary words, then lets you replace or ignore any word that’s not found. It also has a “Learn” function that lets you add unknown words to the dictionary.
Orangoo.comThe free spell checker on Orangoo.com checks spelling in English, Spanish, French, German, Italian, Portuguese and many other languages. You can either type or copy and paste your text into the provided field, then click “Spell Check Your Text Now.” The unrecognized words will be highlighted and changed to links. You can then click the links and select the correct spelling of a word from the drop-down menu. Orangoo.com also provides a tool to spell check your website. After you copy and paste the URL of the website and an email address, the spell check report will be emailed to you.
RespeltRespelt.com has a free online spell check tool that lets you check the spelling of text in English only. You can type or paste text into the field, then click “Check Spelling.” You can also enter the URL of a website or an RSS feed. Misspellings are noted at the top of a field on the right side of the page, as well as in red underlined text within the field. You can click each underlined word to see a list of possible spelling corrections. You can also add unrecognized words to the dictionary. When your text has been corrected, click the “Copy to clipboard” button to copy and paste it into another program.
W3C Spell CheckerThe W3C Spell Checker allows you to check the spelling of web pages in English or French. There is an option to present possible spelling corrections for unrecognized words. After you run the spell check, you can select a suggested term from the list beneath each unrecognized term. If you’re a member of the W3C Comm Team, you can also check a box to add each term to the W3C Spell Checker dictionary.
For more online spell check options, read Enso Words – Free online spell checker.
Related postsCopyright © 2007 Online Tech Tips. Aseem Kishore (digitalfingerprint: a59a56dce36427d83e23b501579944fcakmk1980 (209.85.224.86) ) Post from:
|
| Use 2-Step Verification to Secure Your Gmail Posted: 25 Feb 2011 03:15 AM PST Phishing scams are some of the most popular on the internet. These scams use official-looking dummy Web sites to trick unsuspecting victims into voluntarily providing personal information, such as an email address and password. Most of us who have been using the Web for a decent amount of time have had our email addresses compromised in one way or another—either by falling victim to a phishing scam, or to a random spammer who used our address to send solicitous emails to our friends. For those who want to add an extra layer of security to their email accounts, Gmail has a solution. Instead of just providing a password, Gmail users who opt in for 2-step verification will be asked to use their phones to receive a code to verify their identity.
Recently, Google changed the Gmail layout to where all settings are located under the gear icon on the top right of the screen. Click this icon, then choose Account Settings.
You are re-routed to the main Google account page. Look for Personal Settings and then Security. Choose Using 2-step Verification.
Instructions appear for using this new security method. You are instructed to make sure you have access to a phone—the 2-step method does not work without it. Click Set up 2-step verification.
Choose the kind of phone you have. If you use a smartphone, you will be instructed to download an app to complete this step. If you are using a regular cell phone, you will likely use a text message to receive the verification code.
The verification page appears. Enter the code sent to your phone in the Enter Code text entry box. If you do not want to repeat this code-sending process every time you sign in to your account from the computer you are currently using, make sure you click the box next to Remember verification for this computer for 30 days before clicking Verify.
This 2-step verification only works for the Gmail Web site. You must verify every other application and device that you normally use to access your Gmail, including Outlook and your phone's email client. To do this, on the application-specific passwords page, enter a name for the kind of application you wish to verify.
This added layer of security is both a blessing and a curse. Sure, it does make it a bit harder for would-be spammers and scammers to gain access to a Gmail account, but it can also be very annoying to verify each and every computer you access every month. Luckily, Google is giving us the choice of whether or not to use this level of security. Use your own discretion when deciding if 2-level security is right for you.
Related postsCopyright © 2007 Online Tech Tips. Aseem Kishore (digitalfingerprint: a59a56dce36427d83e23b501579944fcakmk1980 (209.85.224.86) ) Post from:
|
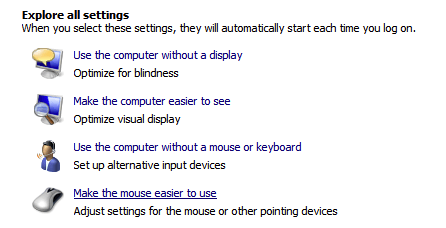
| Change the Windows 7 Cursor to Look Like the Mac OS Cursor Posted: 24 Feb 2011 04:05 AM PST Long ago, when Microsoft made its first graphical user interface (GUI) to replace DOS, one place they looked toward for inspiration was Apple’s GUI. Many of Apple’s design choices were mimicked, and then reversed in an attempt to avoid copyright infringement lawsuits. (It didn’t work; Apple unsuccessfully sued Microsoft for infringement in 1988.) As an example of these same-but-different design decisions, Apple put drive icons on the right by default, while Microsoft put them on the left in Windows. And the Mac’s mouse cursor was black with a white outline, while the Windows cursor was pixel-for-pixel identical, but different in that it was white with a black outline. Many of these design decisions reduced the utility of Windows, at least in the eyes of Mac users, because Apple’s original interface choices were made based on industrial design principles for user-friendliness. For Mac users trying to get work done on a Windows machine, the Windows default cursor can be aggravating. White with a thin black outline, the Windows arrow pointer virtually vanishes on white-background applications like word processors, making it more difficult to locate and use than a black arrow pointer would be. However, it’s entirely possible to use a Mac-like cursor with Windows 7. In fact, the option is built right in and accessible in your Control Panel settings. The reason you might not have run across it before is that it’s in what may seem an unusual spot: the accessibility area, which has settings to make your computer easier to use for the differently-abled. In addition to letting you set speech preferences and size of visual display, the Ease of Access Center has options for selecting different, and larger, mouse cursors. If you’re looking for a system cursor with more contrast or just a more Mac-like feel, follow these steps in Windows 7: 1. Click on Start, then Control Panel, and then Ease of Access Center. 2. In the Ease of Access Center, click Make the mouse easier to use.
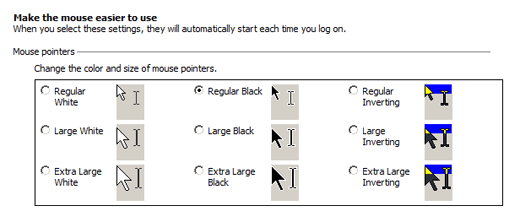
3. This window gives you several options for cursors with different contrast: the typical white cursor in three sizes, a black Mac-like cursor in three sizes, and an inverting cursor that changes depending on the background behind it in three sizes. For the familiar Mac cursor, select Regular Black, the top option in the middle. Click OK to exit the Make the mouse easier to use window, and the X in the upper right corner to exit the Ease of Access control panel window.
Now your mouse should be reversed: black with a white outline, same as the Mac OS cursor.
Related postsCopyright © 2007 Online Tech Tips. Aseem Kishore (digitalfingerprint: a59a56dce36427d83e23b501579944fcakmk1980 (209.85.224.86) ) Post from:
|


| You are subscribed to email updates from Online Tech Tips To stop receiving these emails, you may unsubscribe now. | Email delivery powered by Google |
| Google Inc., 20 West Kinzie, Chicago IL USA 60610 | |
0 comments:
Post a Comment