


 5:24 AM

Computer Tips From A Computer Guy |

| Make Google Searches More Convenient with the DeeperWeb Firefox Add-on Posted: 24 Feb 2011 03:46 AM PST One of the problems with searching for web content on Google is that the search engine simply lists search results by relevancy and popularity. It doesn’t offer any insight into phrases or companion words associated with your search terms. Learn how to make Google searches faster and more convenient using a Firefox add-on called DeeperWeb. Google and Search ResultsThe Google search engine is a marvel of information processing. It collects and processes data from millions of websites to make it easy to find what you are looking for on the web. However, the search engine results page (SERP) generated when you search for words or phrases on Google lists results in order of relevancy and popularity; it doesn’t help you discover similar searches, words, or phrases related to your search. The DeeperWeb Firefox add-on is like a companion to Google that helps you find what you are looking for faster. One of the main features of DeeperWeb is DeepCloud, a word cloud that helps you discover words and phrases related to your Google searches. Using DeepCloud, you can explore related phrases and find what you are looking for without having to think up each search term individually. Using the DeeperWeb Firefox Add-onOpen up Firefox and visit the official DeeperWeb add-on page at Mozilla.org. Click the Add to Firefox button and follow the instructions for downloading and installing the add-on.
Once installed, go to Google and type in any word or phrase you would like to search for. As an example, we will search for the word “popcorn.” Click the Google Search button and you’ll notice two things. First, the Google SERP looks exactly as it always does. Second, DeeperWeb opens in a panel on the right hand side.
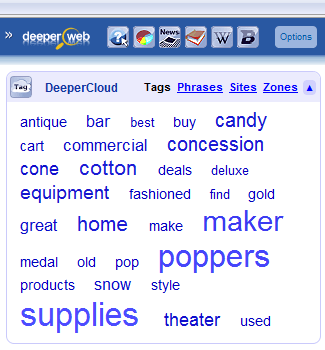
What we are interested in here is the DeeperCloud that appears at the top of the panel. Notice that it shows a number of words associated with our search term “popcorn.” The larger the word, the more related it is to your search term. You can see that “machine” is the word most associated with “popcorn.” Click on it and DeeperWeb automatically makes “popcorn machine” your Google search term. It also generates new related words associated with this new search.
Note that the word most associated with the search term “popcorn machine” is “supplies.” Continuing in this fashion, you can narrow down your searches until you find what you are looking for. If you can’t find what you are looking for, you can simply start over by entering new search terms into Google. DeeperWeb will automatically generate a new word cloud each time you search using Google. The DeeperWeb Add-on for Firefox can help save you time and effort as you use Google. Generating the DeeperCloud word cloud, the add-on shows you the words most associated with your initial search terms. The best part is that the add-on shows up whenever you search on Google. It is non-intrusive and is there for you to use or ignore depending on how much trouble you are having locating the information you want.
Related postsCopyright © 2007 Online Tech Tips. Aseem Kishore (digitalfingerprint: a59a56dce36427d83e23b501579944fcakmk1980 (209.85.224.80) ) Post from:
|
| Reimport Your Microsoft Zune Collection Posted: 23 Feb 2011 04:52 AM PST When you delete your Zune collection, the Zune software will not automatically reimport your collection for you. Once deleted, you have two options: restore from the Zune software's backup or erase the backup. Both options allow you to reimport, but which one to use depends on why you need to reimport your Zune collection. Reasons to ReimportIf you want to change how your collection is managed, such as moving media files to different folders for easier syncing, you must first delete your collection. Even if you delete a monitored folder and add a new one, all files imported to your collection remain. In order to update your changes, you must delete your current collection and reimport using your new settings. Another reason you may need to reimport is if you've accidentally deleted items in your collection. If the files still exist on your computer, but you've removed them from the Zune software, you can restore items by using the backup the Zune software creates for you. This method is a little faster than the first, especially if you have a large collection. If you haven't already deleted your collection, be sure to select the option to Keep File(s), but Remove From Collection. This keeps your files stored on your hard drive.
Reimport CollectionThe first thing you must do before reimporting is to change your Zune software settings, if necessary. For instance, if you've moved your music files to a new folder, select the new folder in the Zune software settings. Settings are accessed by selecting Settings from the top right of the Zune software window. Choose Collection and select your desired folders under the Monitored Folders section. Close the Zune software and disconnect your device before proceeding. Next, delete the collection backup file. Open an instance of Windows Explorer. This is easily done by opening any folder on your computer. Copy and paste the following directory address into the Explorer address bar:
Replace User ID with your Windows computer account ID. If you do not know your ID, press Start or the start globe and look at the right column. The top name should be your computer ID. Press Enter to open the directory once you've entered your user ID. Move or delete the following file: ZuneStore.sdf. If you want to keep your backup file, move the file to another folder, such as My Documents.
Open the Zune software, but do not connect your device, especially if it is set to auto-sync. Allow the collection to reimport. This can take anywhere from a few minutes to several hours depending on the size of your collection. Connect your Zune device after the reimport is complete. Restore from BackupIf you accidentally deleted a few files from your collection, use the restore function from the Zune software. Open your software and select Settings from the top right of the screen. Select Collection from the list on the left. Below the Monitored Folders section, press the Restore button. Choose which types of files to restore, such as music or video.
Problems With ReimportingWhen you delete your collection, delete the backup files and reimport your collection, all podcasts subscriptions are removed. This is the only major problem with reimporting. Any downloaded podcasts will be reimported if they are on your hard drive. You can easily re-subscribe to any podcasts after reimporting. Please keep this in mind to stay up to date on all your favorite podcasts.
Related postsCopyright © 2007 Online Tech Tips. Aseem Kishore (digitalfingerprint: a59a56dce36427d83e23b501579944fcakmk1980 (209.85.224.80) ) Post from:
|


| You are subscribed to email updates from Online Tech Tips To stop receiving these emails, you may unsubscribe now. | Email delivery powered by Google |
| Google Inc., 20 West Kinzie, Chicago IL USA 60610 | |
0 comments:
Post a Comment