


 5:26 AM

Computer Tips From A Computer Guy |

| Edit the Maximum and Minimum Zoom Levels in Firefox Posted: 20 Jan 2011 03:46 AM PST Among Firefox’s more convenient features, you can zoom in and out of webpages to make text easier to read and other elements such as images and videos easier to see. By default, Firefox sets the maximum and minimum zoom levels to values that may be too restrictive or too liberal for some users. Learn how to edit and customize the maximum and minimum zoom levels in Firefox to suit your particular needs. Why Edit Firefox’s Zoom Levels?By default, the maximum zoom level in Firefox is 300% and the minimum level is 30%. For most people, these are reasonable values. However, some people need even more help seeing what's on a webpage. If your eyesight is poor, 300% may not be enough of a maximum zoom level. If you are a webpage designer, 30% may not be small enough to see a whole page at a time allowing you to get an overall view of the layout and design of a page. People who own Internet cafes or who act as administrators of public computers or kiosks often have trouble with mischievous users or people who zoom in and out accidentally. This makes it less convenient for the next person who uses the PC. By editing the default maximum and minimum zoom levels in Firefox, you can customize a user’s experience to the situation. Editing Firefox Max and Min Zoom LevelsEditing the maximum and minimum zoom levels in Firefox cannot be done using the menu system; you have to access the config values directly. Open up Firefox and type the following into the address bar:
When you press Enter, Firefox warns you that editing the config files may void your warranty. If you are confident that you won’t make any mistakes, click the I’ll Be Careful, I Promise button and Firefox will open a screen showing you all of the application’s configuration variables and values.
Scroll all the way to bottom of the screen and locate the second to last variable labeled zoom.maxPercent. Note that the Status of the variable is Default, the Type is an Integer, and the current Value is 300. This tells you that the value of this variable must be an integer and that the default value is the current value of 300%.
Double click on the zoom.maxPercent variable and type in a new value. Remember, this value represents the maximum zoom level in percent that users of Firefox will be able to use. When done, click the OK button. Now locate the variable just below labeled zoom.minPercent. Double click on it and type in a new minimum zoom value. Again, this represents the minimum zoom value users of Firefox will be able to use. Note that the default value is 30%. When done, click the OK button. Close and reopen Firefox to allow the values to reset. From now on, users of Firefox will be able to zoom in using the new value you set for zoom.maxPercent and zoom out using the new value you set for zoom.minPercent. If you ever want to change these values back to default, access the config variables as described above and change the max zoom level back to 300 and the min zoom level back to 30.
Related postsCopyright © 2007 Online Tech Tips. Aseem Kishore (digitalfingerprint: a59a56dce36427d83e23b501579944fcakmk1980 (74.125.94.84) ) Post from:
|
| How to Use Your KeePass Database on Your Blackberry Posted: 19 Jan 2011 04:26 AM PST KeePass is one of the best password manager applications out there, and we've written about it before. It is packed with useful functionality even though it is a free product, and it helps you to generate, save, and organize your passwords. You can import all of your browser bookmarks, sort them, and add your usernames and passwords to your secure KeePass database. All of this is extremely useful, but it does not help if you are on the road. If you are a Blackberry user, you will be happy to know that there is a KeePass port for Blackberries. You can use your existing KeePass database on your Blackberry by following these simple directions. 1. Download and install KeePass for Blackberry on your device. 2. Connect your Blackberry to your PC via USB. 3. Enable Mass Storage Mode on your Blackberry so you can access the microSD card as a removable drive on your PC. 4. Copy your PC's KeePass database to your Blackberry's memory card. 5. Eject the microSD card from your Blackberry, and disable Mass Storage Mode. If you do not do this, you will not be able to access the files on your memory card from your Blackberry. 5. Launch KeePass on your Blackberry. 6. Hit the Menu button, and then choose Import DB from File.
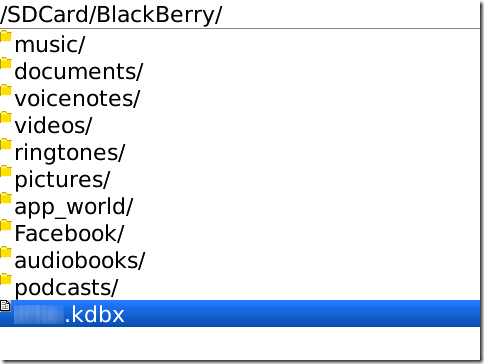
6. Locate your KeePass database file on your microSD card, and choose the file.
7. Enter your database password when KeePass prompts you to. 8. KeePass will decrypt the database, and load all of your username and password information on your Blackberry.
Once KeePass is done importing your database, you can use it just like you do on the desktop.
Related postsCopyright © 2007 Online Tech Tips. Aseem Kishore (digitalfingerprint: a59a56dce36427d83e23b501579944fcakmk1980 (74.125.94.84) ) Post from:
|


| You are subscribed to email updates from Online Tech Tips To stop receiving these emails, you may unsubscribe now. | Email delivery powered by Google |
| Google Inc., 20 West Kinzie, Chicago IL USA 60610 | |
0 comments:
Post a Comment