Computer Tips From A Computer Guy |
- Change the Default Zoom Level in Adobe Reader 9
- Add Footnotes and Endnotes to an OpenOffice Writer Document
- Reduce Print Data for Faster Printing in OpenOffice Writer
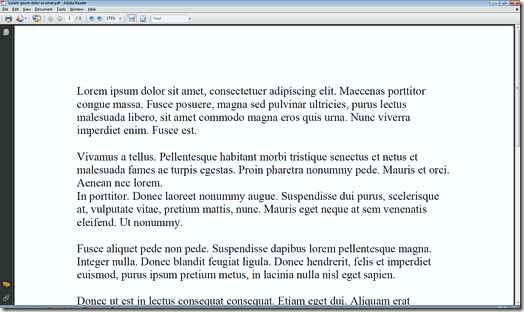
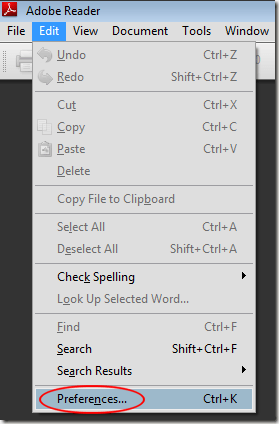
| Change the Default Zoom Level in Adobe Reader 9 Posted: 06 Jan 2011 04:34 AM PST Part of the Acrobat family of portable document format (PDF) applications, Adobe Reader 9 is the company’s latest and free container software for reading documents converted to PDFs. However, Reader 9 is not without its quirks. One of these quirks has to do with the default layout and zoom level the application assumes is best for viewing PDF documents. Adobe Reader 9 and Zoom LevelsBack when everyone had 4:3 ratio monitors, fitting documents to the width of the screen was useful so you wouldn’t have to squint to see everything on the page. Most applications such as Word, WordPerfect, and many other applications fit the width of the page to the screen by default. Now that most computers use widescreen monitors with ratios of 16:9 or 16:10, fitting a document to the width of the screen gives you an in-your-face feeling; the text ends up being way too large and you have to scroll almost immediately to continue down the page. Adobe Reader 9 continues with this tradition by setting the default zoom level to the width of the PDF document. Luckily, Adobe made it possible to change the default zoom level when opening PDF documents; you simply have to change one or two settings. Resetting the default zoom setting can make you more productive if you often find yourself working with PDF documents in Adobe Reader 9. Change Adobe Reader 9 Default Zoom LevelTo change the default zoom level for Adobe Reader 9, begin by opening up the application without opening up a PDF document to do so. In other words, open Reader 9 from the Start menu. For most people, this is located at Start>All Program>Adobe Reader 9. Click on Edit on the menu bar and select Preferences from the drop down menu. This will open up the very complicated Preferences window. To find the options we need, click on Page Display located in the Categories section on the left hand side of the window. Then locate the section of the window labeled Default Layout and Zoom at the top. You need to change two settings here. First, in the Page Layout drop down menu, change the value from Automatic to Single Page. In the Zoom drop down menu, change the value from Automatic to 100%. It is possible that the current settings may be something other than Automatic for the Page Layout and Zoom options. Whatever they are, change them to Single Page and 100% respectively. Adjusting Zoom in Adobe Reader 9Although we set the default zoom to 100% above, you may find that you need to adjust this setting for two reasons. Depending on the physical size of your monitor and your current screen resolution, you may find that you need to make the Zoom setting either higher or lower than 100% to make it convenient to read. You may also want to adjust the zoom level based on personal preferences. For example, if your eyesight is excellent, you may wish to decrease the zoom in Reader 9 to make room for other elements on your screen. In addition, you may find that a zoom level above 100% makes the screen easier to read when two or more people are using the screen at the same time. Play with the zoom setting in Adobe Reader 9 to display PDF documents in a way that is most convenient for you.
Related postsCopyright © 2007 Online Tech Tips. Aseem Kishore (digitalfingerprint: a59a56dce36427d83e23b501579944fcakmk1980 (74.125.94.86) ) Post from: |
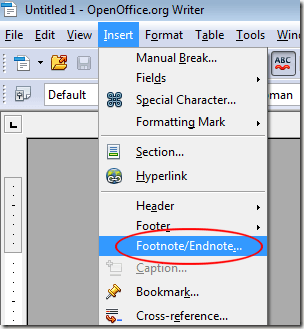
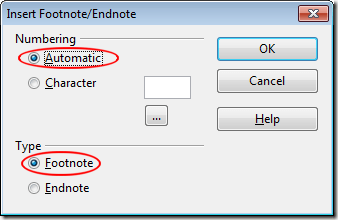
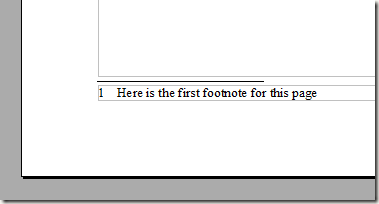
| Add Footnotes and Endnotes to an OpenOffice Writer Document Posted: 06 Jan 2011 03:25 AM PST A full-featured word processor, OpenOffice Writer contains many of the same features as the more popular Microsoft Word. Included as a time-saving feature is the ability to quickly and automatically add footnotes and endnotes to a Writer document. However, first you must decide whether your document really needs a footnote or an endnote. Footnotes vs. EndnotesOnce a popular method for citing sources and providing more information to a reader on a topic, both footnotes and endnotes are quickly disappearing from standard writing. They are being replaced by easier and more paper friendly citation methods such as APA, MLA, and Harvard. However, some fields such as law and medicine still use footnotes and endnotes to help a reader through difficult or complex text. A footnote appears at the bottom of a page and is designated with a number both in the text and in the footnote section of the page. Footnotes are useful for keeping the main text on track but still offer the reader some tangential information pertaining to the subject on the page. Endnotes only appear at the end of a document. They are often used to indicate to the reader where more information can be found on the subject discussed in the main text. Endnotes are usually designated with Roman numerals rather than numbers. Add Footnotes and Endnotes to a Writer DocumentSuppose you have some text in an OpenOffice Writer document and you want to add a footnote to the end of the last sentence you wrote. Position the cursor at the exact point where you want the footnote and click on Insert>Footnote/Endnote. This will open up the Insert Footnote/Endnote window. Since we are inserting a footnote, choose Footnote under the Type section in the window. Now you have to decide whether you want Writer to handle automatic numbering of the footnotes for you. If you are planning on having more than one footnote in the document, it is best to choose Automatic under the Numbering section. When finished, click the OK button. You’ll notice that Writer has placed the first footnote at the bottom of the page. The cursor automatically moves to the footnote so you can type in the footnote’s text. When finished. click on the main text area of your document and continue writing. You may have noticed on the Footnote/Endnote window that you have the option to use any character to designate a footnote. For example, legal and scientific documents often make use of a double S and a character called a dagger to indicate such notes. To choose a special character, click the button with the three dots on it (…). Writer will open the Character Map window from which you can choose your custom symbol. As you may have guessed, adding an endnote to a Writer document is as simple as adding a footnotes. Once again position your cursor where you want the endnote in your document and click on Insert>Footnote/Endnote. When the Insert Footnote/Endnote window pops up, choose Endnote under the Type section. Again, you need choose whether Writer will automatically number your endnotes or whether you want to choose a custom character. Remember that endnotes appear at the end of a document while footnotes appear on the same page as the number (or character) used in the main text to indicate that a footnote is available. By default, endnotes are numbered using lower case Roman numerals. The first endnote in a document starts with i, followed by ii, and so on. If this is not what you want, choose a custom character as described above. Adding footnotes and endnotes to an OpenOffice Writer document is quick, easy, and convenient. Rather than struggle with headers and footers, Writer will automatically keep track of your footnotes and endnotes to let you get back to writing your document. Although footnotes and endnotes are not as popular as they once were, they do have application in some specialized fields.
Related postsCopyright © 2007 Online Tech Tips. Aseem Kishore (digitalfingerprint: a59a56dce36427d83e23b501579944fcakmk1980 (74.125.94.86) ) Post from: |
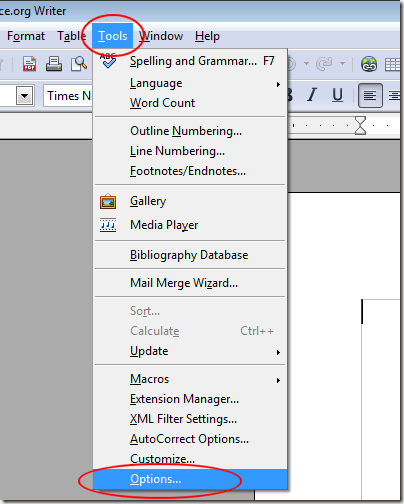
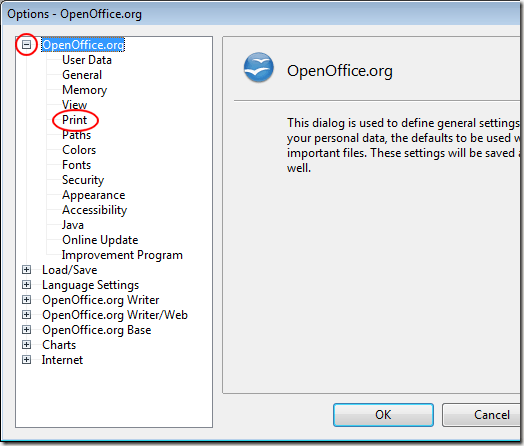
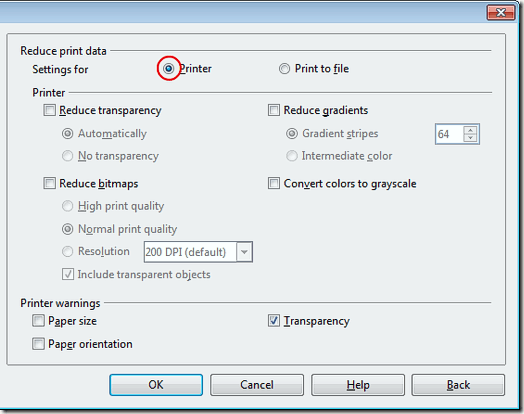
| Reduce Print Data for Faster Printing in OpenOffice Writer Posted: 05 Jan 2011 04:38 AM PST If your printer seems to take forever to print, you may be sending too much information to your printer. OpenOffice Writer lets you reduce print data to decrease the time it takes for information to be sent to a printer. The result is faster printing. Learn how to reduce print data sent to a printer in OpenOffice Writer. Why Reduce Print Data?Much of the information sent to a printer is wasted because it contains a higher level of detail than the printer is capable of printing. Each time you print a document, the information sent to the printer must be captured and interpreted before printing. Sending more information than you printer needs means longer wait times. Reducing the amount of print data sent to a printer means that your printer has less information to capture and interpret. Notorious for having little memory, ink jet printers are particularly vulnerable to long wait times due to inflated print data. OpenOffice Writer gives you the ability to reduce print data by manipulating four key options. By choosing and altering these options, you just may increase print speed and waste less time waiting for your printer to start printing. Reducing Print Data in OpenOffice WriterThe procedures for reducing print data described here actually reduce print data for all OpenOffice application. Writer is singled out here because it is the applications from which users print the most. Begin by opening up Writer and clicking on Tools>Options. In the OpenOffice.org Options window, expand the option labeled OpenOffice.org and click on Print. When you do, the right side of the window shows you the Print options. Locate the section near the top labeled Reduce Print Data. Make sure that Printer is selected and note that you have four main options. Reduce Transparency – Transparent elements in a document take a tremendous amount of data to produce. By selecting this option, you can significantly reduce the amount of data transmitted to your printer. Although you can further choose the Automatically option, choose No Transparency for maximum data reduction. Reduce Gradients – Like transparencies, gradients take a lot of information to produce. When you select this option, you gain access to two more. Choosing Gradient Stripes forces Writer to interpret a gradient with far less information. The result is striping rather than a smooth effect. For more professional results, choose the option Intermediate Color. This option forces Writer to choose a color among the colors that make up the gradient. The result is a solid color where the gradient would be. Reduce Bitmaps – Images often contain much more information than a computer screen or a printer can display or print. Choosing this option gives you access to three choices. High Print Quality is synonymous with 300 dots per inch (dpi) while Normal Print Quality is the default 200dpi. You can also choose a Custom Resolution based on your printer’s abilities. However, if you choose anything less than 150dpi, the results will be noticeably low quality in your printouts. When reducing bitmaps, you also have the choice to Include Transparent Objects. For maximum data reduction, choose this option. Convert Colors to Grayscale – If you are using a monochrome laser printer, choosing the Convert Colors to Grayscale is a good idea. Since you are only printing in black and white anyway, there is no reason to send color information to your printer. With this option selected, Writer converts your images to grayscale before sending them to the printer. By choosing a few options, you can reduce the amount of print data sent to your printer and significantly speed up printing in OpenOffice Writer. In fact, the options you choose are applied to all applications in the OpenOffice suite. Play around with these print options until you reach a balance between quality printing and the time you have to wait before printing begins.
Related postsCopyright © 2007 Online Tech Tips. Aseem Kishore (digitalfingerprint: a59a56dce36427d83e23b501579944fcakmk1980 (74.125.94.86) ) Post from: |
| You are subscribed to email updates from Online Tech Tips To stop receiving these emails, you may unsubscribe now. | Email delivery powered by Google |
| Google Inc., 20 West Kinzie, Chicago IL USA 60610 | |


 5:05 AM



0 comments:
Post a Comment